Blog

Nutrition, Recipes

Portobello Pizzas

Happy Monday!  I write with a recipe today: Portobello Pizzas!

It’s another of my gluten-free creations.  Even five years ago I don’t recall hearing much about problems that gluten can cause, and it turns out there’s a reason.  According to research by the Mayo Clinic, celiac disease (an immune reaction to eating gluten that can cause severe abdominal pain and diarrhea) is on the rise, now affecting one in every 100 people.  Even if you don’t have the full-fledged disease, you might still have a sensitivity to gluten, causing you to experience problems like loss of energy, acne, and various gastrointestinal problems.

No one in my family has a gluten problem, but I do try to reduce the amount of wheat in our diets where I can because I find that it’s just too easy to eat the stuff.  It seems to be in absolutely everything.  As I’ve mentioned elsewhere, I can’t help but wonder: are more people suffering from gluten problems precisely BECAUSE our consumption is on the rise?  Consider it food for thought.

I must have had this in the back of my mind when I saw the portobello mushrooms because I immediately thought “pizza crust substitute”!   So I combined the mushrooms with caramelized onions, sauteed spinach, tomatoes, and mozzarella to create the recipe you see below.

If you’re looking for a quick weeknight meal, you’re going to need to bypass the caramelized onions.  But if you have some time on your hands, they are SO WORTH IT!  The key to making them properly is “low and slow.”  Like so many other good things in life, they can’t be rushed.  For this recipe, I sweated them out for 35 minutes, but truthfully they could have used another 10 minutes to develop the rich caramel color that gives them their name.  If you don’t have the time to invest in this adventure, DO NOT rush it by cranking up the heat.  You’re destined to brown or burn them.  Go low and slow, and you’ll be rewarded with the sweetest onions you’ve ever tasted.  Ones that are so soft they practically melt in your mouth.  I’m salivating just thinking about it.

If you don’t have the time or patience for this, just substitute the caramelized onions for another favorite pizza topping.

This recipe calls for fresh mozzarella cheese.  It does NOT call for reduced fat or – gasp – fat free cheese.  Like many things food-related, I have strong feelings on this subject:  if you enjoy cheese, you should eat cheese, by which I mean REAL, full fat cheese.  Yes, cheese does have a lot of fat, but we need fat in our diets.  Among other thing, it helps our bodies absorb vitamins and minerals in the foods that we eat.  That said, you shouldn’t go overboard on fat consumption, particularly if you suffer from heart disease or are looking to trim down.  This recipe calls for just 1.5 ounces of mozzarella per serving.  And a serving here is TWO rather large mushrooms.  You will be more satisfied with that 1.5 ounces than with three times the amount of yucky fat free Kraft singles.

I loved the way these turned out!  I had them for lunch, but they’d also be super for entertaining.  You could use baby bellas instead of the larger mushrooms and make fun party appetizers.  🙂

Portobello Pizzas

Serves 2IMG_0497

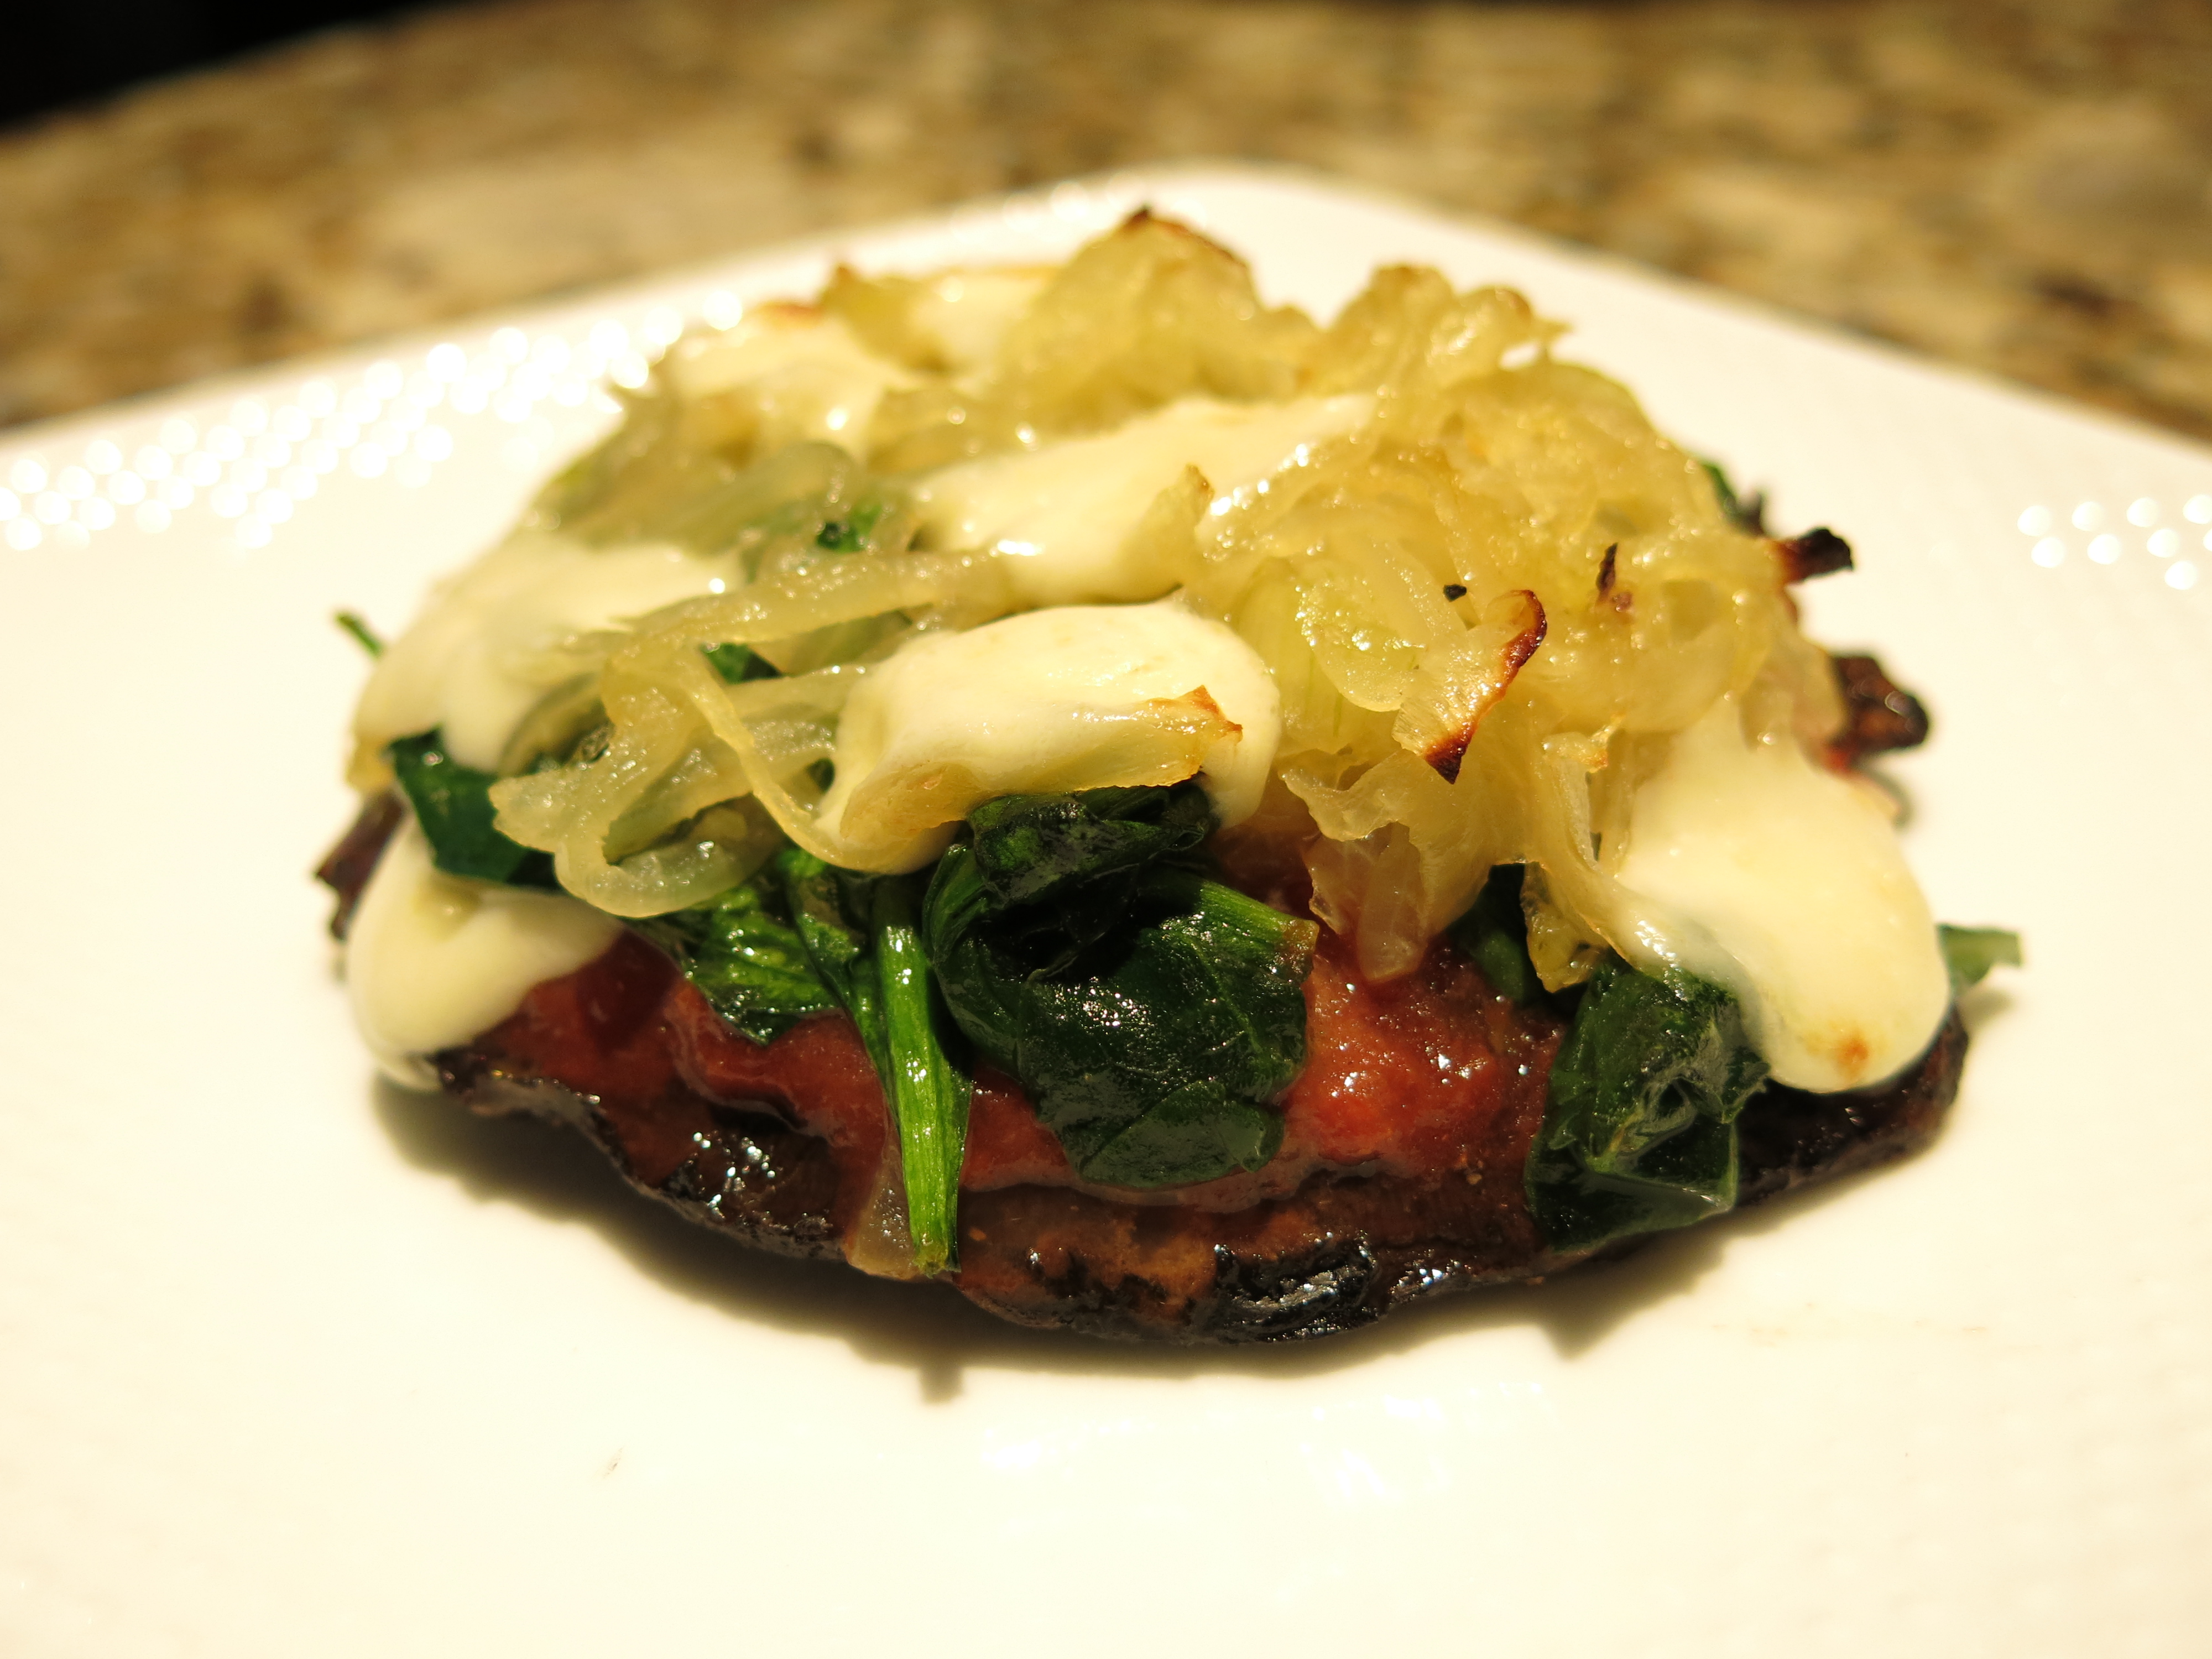
  • 4 large portobello mushroom caps
  • ⅔ cup canned crushed tomatoes
  • 3 ounces fresh mozzarella (get the good stuff, people!)
  • ½ yellow onion, thinly sliced
  • 1 clove garlic, minced
  • 1 1/2 cups baby spinach, packed
  • 2 T olive oil, divided
  • salt and pepper

Heat 1 tablespoon of olive oil in a saute pan over medium heat.  Add the sliced onions and ½ teaspoon of salt, stirring to coat the onions in the olive oil.  After 2 minutes reduce heat to low.  Allow the onions to sweat for about 35 minutes, stirring every 2-3 minutes to ensure they do not brown. The onions are done when they are quite soft and a light caramel color.

While the onions cook, set the broiler to high.  Gently remove the gills from the mushroom caps with a spoon.  Rinse the mushrooms and pat dry.  Brush the mushrooms with 2 teaspoons of olive oil and sprinkle with salt and pepper.  Place the mushrooms on a cookie sheet or shallow baking pan, lined with aluminum foil.  Broil the mushrooms for 6 minutes on each side.  Remove the mushrooms from the pan.

Turn off the broiler and set the oven to 450 degrees.

Heat the remaining teaspoon of olive oil in a saute pan over medium-low heat.  Add the spinach, garlic, and a dash of salt and saute, stirring constantly, until the spinach wilts and the garlic is fragrant (about 2 minutes).

Line another cookie sheet or shallow baking pan with aluminum foil.  Transfer the mushrooms to the pan and layer them with equal amounts of the toppings:  tomatoes, spinach, onions, then cheese.  Bake for 5-7 minutes, until the top of the pizzas just begin to brown.

Advertisement
Nutrition, Recipes

Ingredient Combinations to Make Your Own Recipes

You’re in a cooking rut, making the same things over and over again.  You are bored.  You head to the grocery store to pick up some ingredients for dinner, hoping to make something different this time.  You find yourself in the middle of the produce section, overwhelmed by all the choices, thinking to yourself, “Where do I begin?”

spice drawer
Arial view of my spice drawer. Way more convenient than storing these in a pantry, btw.

Sound familiar?

Lately it seems several friends, family members, and clients keep telling me the same thing: I want to experiment with new foods, but I have no idea WHAT GOES TOGETHER.  I’m ok when I have a recipe that I can follow, but if I find myself in the store without that guidance, I’m at a loss for what to buy.

I used to be the same way.  When I first got into cooking, I was slave to the recipe, following everything to a T, afraid of deviating in the slightest way, lest I screw something up.  Gradually, I started taking a little creative license.  I still used recipes as a starting point but would swap one ingredient for another here, one cooking method for another there.  Now I’ve progressed to the point where I feel confident enough to create recipes on my own.

Today I’m sharing some of my “Go-To” flavor and ingredient combinations.  The lists are by no means exhaustive, but they provide a good starting point, and all of the items complement each other pretty well.  I’ve arranged them in what I like to call “Chipotle style,” where you pick your carbohydrate base, add the veggies you want, heft it up with your protein(s) and healthy fat(s) of choice, then flavor as you prefer.  The nice thing about organizing items this way is the flexibility it affords.  Feel free to omit categories as you like (maybe you’re watching your carb intake and want to skip this one, for instance), and choose as many or as few items from each category as suits you.

And if it STILL seems overwhelming, pick just one ingredient and go from there.  I do this all the time.  Have some avocados in your refrigerator that need to go?   Avocados always get me thinking Mexican, so pick up some black beans, tomatoes, onions, corn, bell peppers, lime, and cilantro.  Dice the veggies, chop the cilantro, and toss everything together in a bowl.  Stir in the lime, maybe a bit of olive oil, and salt and voila!  You have a fresh salad for lunch, with plenty of leftovers for tomorrow.   Looking for a heartier main dish?  How about combining all of the Mexican “flavors” below with some salt and olive oil and using it as a beef marinade?  You could then simply top the meat with sliced avocado or make a guacamole.  The “start with one ingredient” strategy works equally well if you find yourself hankering for something (“Gosh I am REALLY in the mood for some eggplant tonight, but what should I make?”) or want to experiment with a new ingredient (“How do you cook tofu anyway?”).  In the latter case, remember google is your friend.  And don’t be afraid to mess up.  If you destroy the tofu, you can always omit it from the dish.  Or feed it to the dog.  Assuming dogs can eat tofu.  I don’t have a dog, so I’m really not sure.  But you get the picture.

Oh and everything on the lists fits my definition of healthy.  I almost always opt for whole grains over refined ones, so you’ll see brown rice on the list but not white rice.  Fat is critical for good health, but not all fats are created equal.  My lists include those that I use and consider healthy.  I’m also not a vegetarian, so animal proteins make the cut.  I simply suggest that you opt for lean varieties.

Speaking of protein, look closely, and you’ll see that every list has the same protein choices.  This simply reflects my belief that proteins go with just about anything.

So go on!  Step outside your culinary box, and unchain yourself from the recipe!

Mexican

Carbohydrate: brown rice, black beans, pinto beans, corn, whole wheat or corn tortillas, plantains

Vegetable: bell peppers, tomatoes, onions, zucchini, crispy lettuce (e.g. romaine)

Protein: tofu, lean animal proteins (beef, chicken, pork, etc), fish

Healthy fat: avocado

Flavor: cumin, coriander/cilantro, chili powder, paprika, oregano, lime

Asian

Carbohydrate: brown rice, brown rice noodles

Vegetable: snow peas, mushrooms, bell peppers, broccoli, baby corn, green onions, bean sprouts

Protein: tofu, lean animal proteins (beef, chicken, pork, etc), fish

Healthy fat: peanuts or peanut butter, cashews, sesame seeds or oil, coconut oil or milk

Flavor: soy sauce, fish sauce, sriracha, red or green curry paste, lemon, lime, cilantro/coriander, ginger, rice vinegar

Indian

Carbohydrate: brown rice, potatoes, daal/lentils, whole what naan

Vegetable: tomato, okra, french or green beans, eggplant, zucchini, onion

Protein: tofu, lean animal proteins (beef, chicken, pork, etc), fish

Healthy fat: coconut, coconut oil, coconut milk

Flavor: Cilantro/coriander, cumin, garam masala, turmeric, chutney, curry powder, lime, ginger, mustard seed


Lifestyle, Pregnancy

The Supermom Cape

My sister had her first baby recently, and I’m out in Phoenix right now, lending a hand.  I say that a bit loosely since my toddler, Siyona, came along with me, and sometimes I feel like my sister is helping ME more than I help her!

In any case, in a conversation prior to my arrival she expressed some feelings and behaviors that are common among postpartum moms.  She’s constantly fatigued because she’s up every three hours at night breastfeeding.  She tries to make up for the sleep during the day, taking naps whenever her daughter is napping.  Consequently, she doesn’t get out of the house much, and because she’s home alone with her daughter, she often feels lonely and isolated.

As a mom myself, I totally relate to this!  But I also learned through my own experience that sometimes the best thing to do when you’re feeling exhausted is to push back against it, or, as I like to say, to don the “Supermom Cape.” So I decided that one way that I would offer help during my visit was by showing her the special powers that this cape holds.

As it turned out, I found myself needing to lead by example.  Siyona and I arrived in Phoenix from the east coast, three time zones away.  We’ve both been waking up early, but she’s not as content as I am to linger in bed at 4:30 a.m. To make matters worse, I’m nearly seven months pregnant and sleeping poorly throughout the night, plagued by uncomfortable pregnancy symptoms like restless leg syndrome and the constant need to use the bathroom.

I reached for the Supermom Cape when I found myself particularly exhausted one morning. It was 6:15 a.m., and I forced myself into the shower.  I told my sister I was making myself presentable and planning to go out.  I would take Siyona with me and her daughter too if she wanted to lay back down to sleep.  I put on a cute maxi dress, blow dried my hair, and applied make-up.

She rose to the challenge and cleaned herself up too (luckily I packed a spare cape with me, you see).  Downstairs she emerged with styled hair and in her own cute dress. It was nearly 9:30 by the time we all made it out the door, but we were on our way!

We ended up having a lovely morning.  But the real point is this: the moment I made the mental shift – the moment I put on my Supermom Cape – I felt my energy level rise.  I was determined to be capable, to not let the fatigue win.

I was reminded of a time during my first pregnancy when I saw a woman with a newborn on a flight.  She was traveling alone, and she just appeared to have it together.  I passed her as I walked down the aisle of the plane to my seat.  She was sitting nearer to the front, reading a book while her baby fed discreetly and contently under a breastfeeding cover.  I thought to myself, “That’s the mom I want to be.”

And on this morning, I was determined to be the woman on the plane.  And I was.  And so was my sister.  And it felt – if I can be so liberal with the word – empowering.

I don’t put on my cape every day.  In fact, sometimes it’s good to leave it folded neatly in the drawer or hanging in your closet.  Sometimes you really DO need to forgo the shower – even the toothbrush – and just rest any moment you can.  But just don’t let the fatigue win out every time.  Otherwise, you miss out on some great things, like these:

macchiato


Enjoying an expertly made espresso macchiato (my favorite drink!) at a fantastic Scottsdale coffee shop…


Mia (2)


…while looking fabulous and capable, holding my beautiful new niece…


selfie 1 selfie 2


…just before taking goofy selfies with my equally beautiful daughter.


So go for it!  Get your Momcape on!  The world needs more superheroes. 🙂

Exercise, Nutrition

Book Recommendation: “The Men’s Health Big Book of Exercises”

Among the resources in my PT library is “The Men’s Health Big Book of Exercises.”  I’m here to tell you why I like it and why you should consider picking up your own copy.

The Book

The lion’s share of this book is the exercises – 619 of them, in fact.  Of the book’s 15 chapters, nine of them pertain to the exercises BBE Coverthemselves, with a separate chapter for various body parts – chest (chapter 4), back (chapter 5), shoulders (chapter 6), etc. Each of these chapters begins with a just-technical-enough description of the muscles involved and corresponding pictures.  The well-illustrated exercises follow with key points on proper form highlighted.

The book also includes chapters that discuss the importance of resistance training, answer common questions about training (e.g. how many reps should I do? what weights should I select?), offer diet and exercise plans, and discuss nutrition.

Why I Like It

My favorite thing about this book are the exercises themselves.  Even with all the resources available online, it’s nice to have a physical book to pick up and leaf through.  I often find myself turning to this book when looking for inspiration for new exercises for my clients, and the illustrations are top notch.

I also think the author strikes the right balance between technicality and simplicity, making it a good resource for BOTH trainers and a more lay audience.  For instance, the rank and file may really appreciate the anatomy material, while more informed readers can probably skip this over.  At the same time, there’s other more detailed material that lay readers may skip over but fitness professionals may really appreciate.

The nutrition chapter has a section entitled, “The Simplest Diet Ever,” which I largely endorse.  Many people struggle with how to eat for fat loss, largely because there’s so much information out there, a lot of which is conflicting.  When working with clients who hope to trim down, I emphasize what I consider the key points, many of which the author outlines in this chapter: eat a lot of fruits, vegetables, and lean protein; eat healthy fats in moderation; reduce your intake of starch and sugars; watch your total caloric consumption.  Certainly the EXECUTION of these principles may still prove daunting, but at least the reader knows where to begin.

A Minor Quibble

Overall, I think this book is great, but there is one change I’d like to see.  Many of the 619 exercises in the book are variations on a more basic move.  The barbell squat, for instance, has ten variations, including wide-stance, front-loaded, and quarter squat.  My issue is that often the author fails to explain WHY someone might want to select one variation over another: are different muscles recruited? does one variation put less stress on certain joints and is therefore better for certain populations?  Is it just about variety?

BBE Cover-close up
Here’s a close-up, in case you’re having trouble following me here.

There’s also a book out there entitled, “The Women’s Health Big Book of Exercises.”  I don’t own this one, but from what I understand, it’s basically the same book, but the language is geared more towards women (more talk of getting “tone” rather than “cut”), and the illustrations contain women performing the exercises.  Personally, I think the author missed the mark here.  I mean, do you see the eye candy on the cover of this book?  I guess we can call that a second quibble.  🙂

All-in-all, this is a great book!  I picked up a cheap used copy online.  And even if you dislike the content, it’s hard to argue with the eye candy.

Nutrition, Recipes

Banana Blueberry Muffins (Sugar- and Gluten-Free)

Whoever said that baking is a science wasn’t kidding.

I learned that the hard way in the process of creating the recipe I’m offering today.  It took me somewhere between six and nine tries (at some point I lost count) to get it right.

I wanted to make a sugar- and gluten-free version of an old favorite: the banana muffin.  I took as my starting point a traditional recipe (read: one with wheat flour and lots of sugar) and brainstormed ways to adapt it.  The problem is, when you change one thing, you risk throwing off the entire recipe.  It’s not like cooking where you can take a lot of creative license with little risk.

The first thing I knew I wanted to do was substitute almond flour for the white wheat flour.  Google told me I could substitute these 1:1 if I increased the leavening agents, but it failed to offer details.  My recipe called for three leavening agents – eggs, baking soda, and baking powder.  Was I to increase one, two, or all three of them?  And by how much?

There were other unanswered questions too.  I planned to entirely remove the sugar, but should I replace it with something?  If so, what, and how much of it?

So I guessed.  And I guessed again, and again, and again. I’ll spare you the gory details of my various attempts and instead illustrate why I went to all the trouble with a side-by-side comparison of calories, macronutrients, and sugars in the revised and original versions of these muffins:

Gluten & Sugar-Free Muffin      Traditional Muffin
Energy 206 cal 293 cal
Total Fat 17.2 grams 26 % DV 14.6 grams 23% DV
Saturated Fat 1.3 grams 6% DV 2.2 grams 11% DV
Protein 5.8 grams 12% DV 3.0 grams 6% DV
Carbohydrates 11.7 grams 4% DV 39.9 grams 13% DV
Fiber 3. 0 grams 12% DV 0.9 grams 4% DV
Sugar 5.3 grams 26.6 grams

If you’re watching your calories, you’re saving almost 100 of them with the sugar- and gluten-free muffin.  Thanks to the almonds, the new muffin offers twice the amount of protein, half the amount of saturated fat, and three times the amount of fiber as the old one.  And while the old muffin has 27 grams of sugar, the new one has only 5 grams, all of which are natural sugars that come from the fruit.

The chart above doesn’t say anything about vitamins and minerals.  If it did, the new muffins would again be the clear winner.  The almond flour is loaded with ‘em, including vitamin E, manganese, magnesium, and copper.  The white flour used in the old muffins is essentially void of all these goodies.

There you have it!  Give the recipe a shot and tell me what you think!

Sugar- and Gluten-free Banana Blueberry Muffins

Makes 8 muffins

  • 1 cup ripe bananas (about 2 medium-sized bananas)muffin
  • 1 egg, divided
  • 3 T canola oil
  • ½ t vanilla
  • 1 ½ cup almond flour, sifted
  • 1 t baking soda
  • 1 ¼ t baking powder
  • ½ t cinnamon
  • ½ t nutmeg
  • ½ t salt
  • 2/3 cup blueberries
  • 8 baking cups

Preheat oven to 350 degrees.

Line a muffin tin with the baking cups and set aside.

Mash bananas in a medium-sized bowl, using a fork or potato masher.  Mix in egg yolk, oil, and vanilla.

In a separate bowl, blend almond flour, baking soda, baking powder, salt, cinnamon, and nutmeg.

Gently add the dry ingredients to the wet ingredients, stirring just to combine.  Fold in blueberries and egg whites, again stirring just to combine.

Divide batter evenly among the lined muffin cups and bake for 30 minutes.

Exercise, Pregnancy

Why You Should Deadlift – Even if You’re Pregnant!

A few weeks ago I picked up a new personal training client – my husband.  The pay is terrible, but he’s easy on the eyes, so we’ll call that a nice fringe benefit.  Plus I know he won’t sue me if I say something inappropriate or slap his butt during a training session.

In any event, last week we worked out together during his session.  I had him doing deadlifts, and then he about had a heart attack when his six-month pregnant wife stepped up to take her turn.  Something in his eyes said, “Will our unborn child drop from your uterus if you pull that bar again?”

I get it.  Deadlifts look serious.  And they are!  But they are also a great exercise to include in your fitness routine, pregnant or not.  In fact, pregnant women may have even MORE to gain from the deadlift than the average Jane or Joe.

What’s So Great about the Deadlift?

The deadlift targets a myriad of muscles in your posterior chain – basically the entire backside of your body, including your back, glutes, and hamstrings.  If you’re a desk jockey or someone else who does a lot of sitting (read: most of the American population), there’s a good chance these muscles are relatively weak.  In fact, every client I’ve ever trained has exhibited weakness in or more of these muscle groups.

Pregnancy tends to exacerbate these muscular imbalances as the uterus expands and the center of gravity shifts forward, causing an unwelcome chain of reactions.  The pelvis tilts anteriorly (forward), increasing the curve of the lumbar (lower) spine.  The resulting lordosis, along with the increased weight in the breasts, can cause the shoulders to roll forward and the upper back to round.  This can shorten and tighten some muscles, including the hip flexors (quads, for instance) and pecs/chest, while lengthening and weakening others, including the – you guessed it! – back, glutes, and  hamstrings.

The deadlift is a great way to strengthen all of these weak muscles in a single exercise.  Let’s learn how to do it!

Performing the Deadlift

Set your loaded bar on the floor in front of you.  Step all the way up to the bar, so that it’s almost touching your ankles or shins, depending on the size of your plates.  Stand with feet shoulder width apart and toes slightly turned out.

Lower yourself to the floor by first hinging at your hips, so your hips move behind you as your knees bend.  Grab the bar with a pronated grip (palms facing your body), hands just outside your legs.  Take the slack out of your arms by lifting your hips a little higher and taking some of the bend out of your knees.  Roll your shoulders down and back and assume a neutral spinal position.  Do NOT round your upper back.

With a firm grip on the bar, brace your core and push your hips forward as you come to standing on an exhale.  Then reverse the movement, lowering the bar back to the floor, again allowing your hips to lead the way.  Touch the bar briefly to the floor and repeat for desired number of reps.

It should look like this:

Hips move first as you lower yourself to the bar.
Keep spine neutral as you bring hips forward and lift.
End position. Return to standing.


And if a picture is worth a thousand words, then a video must be worth a whole lot more.  Here’s a short clip of me performing the deadlift with a view from the front:

Some caveats are in order.  Whether you’re pregnant or not, please work with a trainer if you are new to this exercise.  Likewise, keep the intensity low as you train your body to perform the exercise properly and build your muscle memory.  If you are pregnant, make sure you clear this and all exercise with your doctor before beginning.

Have fun with this one!  My back side has become so much stronger since incorporating the deadlift into my regular fitness routine.  Plus it just makes me feel powerful.  🙂  It’s one of my favorite exercises, and I hope it becomes one of yours too!


Exercise, Pregnancy

Pelvic Girdle Pain (PGP) and Pregnancy

Are you a pregnant or postpartum woman who experiences pain in the front or back of the hip, lower back, buttocks, or down the leg?   Does the pain create difficulty standing on one leg, getting in and out of cars, or climbing stairs?  If so, then you might be experiencing pelvic girdle pain (PGP), also known as symphysis pubic dysfunction.  Today you’ll learn what it is, what causes it, and what you can do about it.  If you don’t have the symptoms yet, you’ll also learn what you can do to minimize the risk of developing PGP.

Pelvis
Image taken from http://www.piaaustralia.com/what_is_pgp.html

The pelvis has three primary joints: two sacroiliac joints and the symphysis pubic joint.  The former join the pelvis in the back while the latter joins the pelvis in the front.

These joints have very little movement – usually.  But during pregnancy, women experience a rise in the hormone, relaxin, which relaxes tissues and joints in the body.  This is important to prepare the body for labor, but it has the unfortunate side effect of increasing joint instability.  If movement in the hip joints increase, it can create the symptoms described above, causing PGP.  The pain can be debilitating and is common in pregnancy.

Women can decrease their risk of developing PGP by strengthening their core muscles, which support the pelvic joints.  Pelvic tilts are a great way to strengthen the transversus abdominis (TVA), the deep abdominal muscles that lie beneath the rectus abdominis, or the “six pack.”  Performing kegels will strengthen the pelvic floor, and performing opposite arm-opposite leg reaches from the quadruped (all fours) position will strengthen both the lower back and the TVA.  The glutes are also a part of the core, although we don’t typically think of them this way. Exercises that effectively target these muscles include single leg squats, glute bridges, and donkey kicks.

Other exercises place pregnant and postpartum women at a greater risk for developing PGP.  Women should avoid quick or jerky movements that may cause the bones to separate.  Lateral and rotational lunges when executed powerfully can also be problematic, as are exercises that abduct the legs simultaneously (e.g. those that bring the legs apart, such as the the hip abduction machine).

If you do suffer from PGP, you’re not alone.  And now you have some tools to help you find relief!


Nutrition, Recipes

Ode to the Mango: Part II (The Recipe!)

Last Monday I said a yummy mango recipe was headed your way today.  Have you been unable to sleep since then?  Been like a kid counting down the days til Christmas? Okay, so maybe “waiting with bated breath” is an exaggeration, but I do write today with the recipe!  It’s is a little on the fancy side but not terribly challenging to prepare.  I’d say it has an elegant simplicity that is worthy of a special occasion.  Even the name sounds a little fancy: Pepita-crusted Turbot with Avocado Mango Salsa Another Nutritious Meal (and what the heck is a pepita anyway?) If you think you’re unfamiliar with pepitas, you’re probably wrong.  It’s just a fancy (or Mexican) way of saying “pumpkin seeds.”  Pepitas have a lot to offer nutritionally.  One-quarter cup provides 3 grams of fiber (12% DV), 2.7 mg of iron (15% DV), and 9 grams of protein.  If you’re watching your saturated fat intake, keep in mind that pepitas do have a relatively high amount of this.  A serving contains 20% of your saturated fat intake for the day (4 grams), twice as much as peanuts.  But pepitas are also loaded with omega-3 fatty acids, which peanuts lack.  Among other things, omega-3 fatty acids reduce triglycerides, decrease blood pressure, and lower your risk of heart disease. Omega-3’s are actually a theme in this recipe.  Not only do the pepitas have them, but so does the avocado, along with vitamins A, C, B6, and E; folate; potassium; and magnesium. Turbot is a mild white fish.  It packs a protein punch while being relatively low in fat and calories.  Each six-ounce serving in this recipe has 162 calories, 27 grams of protein, and five grams of fat, very little of which is saturated. Taken together, this dish provides an excellent balance of micronutrients and explodes with essential vitamins.  It was quick and easy to prepare.  I really liked it, and I hope you do too!

Pepita-crusted Turbot with Avocado Mango Salsa

pepita final
So pretty!

Serves 4

  • 1 avocado, diced
  • 2 ataulfo mangos, diced
  • 1 green onion, diced
  • ¼ cup cilantro, chopped
  • 1 lime, juiced
  • dash of salt
  • 1/3 cup toasted pepitas, coarsely ground
  • 2 t cumin
  • 1/2 t salt
  • 4 – 6 oz turbot fillets
  • 2 T olive oil

Remove turbot from refrigerator 30 minutes before cooking. Preheat oven to 400 degrees. Gently combine salsa ingredients (mango through “dash of salt”) in a medium-sized bowl and set aside. Combine petitas, cumin, and remaining 1/2 teaspoon of salt in a wide, shallow bowl.  Pat turbot fillets dry with a paper towel.  Brush the olive oil on both sides of the fillets, using a pastry brush. Gently roll the fillets in the pepita crust to coat. Transfer the fillets to a shallow baking pan, lined with parchment paper or aluminum foil.  Bake for 10 minutes, turning halfway through, until the turbot flakes easily with a fork.  Top the fillets with the salsa.

 I simply can't help but throw pictures of Siyona into the blog whenever I have an excuse to do so.  Here's a pic from back in the day.  Avocado was her first food, and she's taking one of her first bites!
I love making excuses to throw pictures of Siyona into the blog. What can I say? I’m her mom. Here’s a pic from back in the day. Avocado was her first food, and she’s taking one of her first bites!

Nutritional Information (per serving)*

  • Energy: 379 calories
  • Total Fat: 21.7 grams (36% DV)
  • Saturated Fat: 4.25 grams (17% DV)
  • Protein: 31.2 grams (62% DV)
  • Carbohydrates: 15.8 grams (5% DV)
  • Fiber: 4.9 grams (20% DV)

*Daily values (DV) are for the general population.  Women who are pregnant or breastfeeding need additional energy, particularly in the form of protein, than non-pregnant, non-breastfeeding women.

Nutrition

Ode to the Mango: Part I

Mmmango.

If you forced me to identify my favorite fruit, it just might be the mango.  Now that Spring has (finally!) arrived, they are piling up in the produce department!

But not just any mango – the Ataulfo mango, also known as the Champagne mango.

In other words, this guy…                       ….not this guy.

Ataulfo tommy atkins


The other guy is the Tommy Atkins.  He’s pretty good too, but he’s nothing like his cousin.  The Tommy Atkins is more fibrousy with stringier flesh.  The Ataulfo has a much creamier texture.

I love mangoes so much that I’m going to devote the next two weeks to them.  Today you get Part I, where we cover the awesomeness of the Ataulfo, and I share some tips on how to unlock their juicy goodness (read: how to cut the darn things). Next week, I’ll share a recipe where you can put those knife-cutting skills to use.

A Nutritional Powerhouse

Mangoes have over 20 different vitamins and minerals, leading some to call them a “superfood.”   Eat just a cup of Ataulfo mango and you’ll get half of your vitamin A intake for the day, 70% of your folate (a B vitamin), and 320% (!!) of your daily requirement of vitamin C.  These are all vital nutrients for a healthy pregnancy, which helps explain why I often see them on lists of foods most recommended for moms-to-be.  Mangoes are relatively high in sugar and calories compared to some other fruits though, so don’t go totally nuts with them, especially if you have a fat loss goal.  To give you a frame of reference, one cup of Ataulfo mango has 110 calories and 18 grams of sugar, while one cup of strawberries has about 50 calories and seven grams of sugar.

But How Do You Get INSIDE?

Last week while lunching with a friend and client, I pulled a mango out of my bag.  She told me she never buys them even though she really likes them.  Why?  Because she doesn’t know the best way to eat them.  Tragedy!  But I get it.  Mangoes certainly aren’t like grapes, strawberries, apples or the myriad of other fruits that you can simply rinse off and enjoy.  Nor are they like bananas or oranges which, even though they have peels, are still pretty darn easy to figure out.

I’ve seen people cut mangoes a few different ways.  Here’s the way that works best for me.

The Ataulfo has a large, flat pit that runs both the length and width (the widest width, if that makes sense!) of the mango.  First, cut the mango in half by running a very sharp knife down either side of the pit like so:

IMG_0361IMG_0366


Try to get your knife as close as you can to the pit, so you’re left with two very large “cheeks.”  And please, please, please watch your fingers!

Next, simply slice the mango cheeks into pieces by running your knife through the flesh, being careful not to cut through the skin.  Then invert the skin, so mango chunks pop out:

IMG_0369IMG_0365


To remove the chunks, either run your finger or the knife between the skin and each chunk of fruit.  If you’re just snacking on the mango, you can also just bite the chunks off.  🙂

To be fair, mangoes ARE more work and messier to eat than a lot of other fruits, but they’re not nearly as bad as, say, the pomegranate.  And once you’ve EXPERIENCED the mango and all its sweet, juicy goodness, hopefully you’ll find – as I do – that they are well worth the effort!

That’s all for now.  Tune in again next week when I offer a recipe that features the mango.  You’ve got seven days to stock up!


Exercise, Pregnancy

Full Body, Fat Torching Circuit!

I feel like I haven’t posted any good exercises recently.  Let’s fix that!

WellMom offers small group training in addition to one-on-one PT.  I like to call it “Mom Camp.”  🙂 Today I’m sharing a workout that some current campers recently performed.  It’s a full body, fat torching workout designed to leave you breathless!

Like many of WellMom’s fat loss circuits, it relies on the principle of rest-based training.  The idea is you push yourself hard – as hard as you can! – until you simply must take a break.  Then you rest just long enough until you’re ready to hit it again.  Heavy resistance is also key.  In fact a good starting weight is one that you have to reduce at some point during the workout.  The high intensity interval training coupled with heavy load increases your afterburn, or the calories you burn up to 48 hours AFTER your workout!  What’s that you say?  Burning calories when I’m doing nothing?!  You heard me correctly.  And the whole thing only takes 25 minutes out of your day!

I have my campers do a lot of this type of training, and it works!  Just halfway through their 8-week program, the group of four moms that recently performed this circuit have collectively torched 16 pounds!

Full Body, Fat Torching Circuit

Note:  Prenatal moms should approach this circuit with caution.  It is appropriate for those accustomed to intense training but not for those new to exercise.  Postpartum moms who aren’t yet ready for intense training should also avoid this circuit.

Warm-up

Jumping jacks (30 seconds); dynamic squats (30 seconds); alternating dynamic lunges (30 seconds).  Repeat.

20-minute Circuit

Repeat each exercise sequentially for the specified time and complete 5 rounds.  Push yourself as hard as can while you’re working, breaking as often as you need.

1. Dumbbell thrusters.  1 minute

(Do these as quickly and explosively as possible!)

OLYMPUS DIGITAL CAMERAOLYMPUS DIGITAL CAMERA


2. Overhead tricep extension, holding glute bridge. 1 minute

OLYMPUS DIGITAL CAMERA   OLYMPUS DIGITAL CAMERA


3. Push-up with row (on knees or toes), alternating arms. 1 minute

OLYMPUS DIGITAL CAMERAOLYMPUS DIGITAL CAMERAOLYMPUS DIGITAL CAMERA


4. Static front lunge.  30 seconds with each leg leading

OLYMPUS DIGITAL CAMERA OLYMPUS DIGITAL CAMERA


 Cool-down

Walk for two minutes.

*****IMG_0617 (2)

And since I mentioned Mom Camp, here’s a picture of two of my moms from camp last week.  We often round out class with some flexibility training.  Doesn’t Caitlin make triangle pose look fun?  🙂

If YOU want to go to camp, drop me a line!  I also offer small group training for postpartum moms where the intensity is much lower and the focus is on rehabilitation of the inner core, (pregnancy and delivery – whether vaginal or Cesarean – wreak havoc on this area of the body).  I’d love to see you in my next class!

Kids, Recipes

Banana Almond “Cookies”

I have a confession:  I brainwash my child.

Don’t report me to CPS.  Please.  I do it because I love her.

I don’t serve Siyona, my toddler, sugary snacks.  No ice cream, no cake, no doughnuts, no cookies.  Or at least not in traditional varieties.  This is not the brainwashing part, but we are getting there.

Around my house we eat “cookies,” not cookies.  They have just three ingredients, and they are very healthy.  Now before you hang up with CPS and start dialing the Fun Police on me, let me also note that they are very tasty.  At least I think so, and Siyona seems to agree.

The recipe is an adaption of a recipe I received a while back from a client (thank you, Jill).  It was so long ago that I’ve since misplaced the link to the recipe, or I would give credit where due.  Whoever you are, genius recipe maker, kudos to you.

All you do is mash some banana, stir in almond flour/meal, add a dash of cinnamon, and voila!  You have “cookie” dough!

These are so easy that I tend to make them in small batches, but you could increase the quantities to make more cookies.  I’ve never tried to freeze them, but I suspect they would freeze quite well.

I can’t begin to describe how excited Siyona gets when I pull these out!  Instead I’ll let the pictures below tell the tale.  I know they won’t have this allure forever, but I’m riding this wave for as long as I can.

Eyes on cookie...
Eyes on cookie…
...contact made...
…contact made…
...and it's a winner!
…and it’s a winner!


And if you’re wondering if she’s ever had a REAL cookie, the answer is yes.  And cake, yes, REAL cake too.  Occasionally she’ll eat treats like this at school or on special occasions.  I admit I don’t like it, but I don’t want her to feel ostracized from her peers.  And really it’s not that I NEVER want her eat these things.  Life would seem less fun if she never enjoyed, say, an ice cream cone on a hot sunny day.

But I also believe tastes and preferences are shaped at a young age, so I’m doing my best to instill good eating habits now.  It seems to be working.  Would she choose ice cream over carrots if both choices were placed in front of her?  Absolutely!  Seriously, who wouldn’t?  But does she like carrots?  Yes.  Broccoli?  Yes (especially if it has cheese.  Again, duh).  Brussels sprouts?  Yes.  And the list goes on.

OLYMPUS DIGITAL CAMERA
I should really probably buy some stock in Trader Joe’s.

Banana Almond “Cookies”

Makes 4 small cookies

  • ¼ cup banana, mashed (about ½ medium banana)
  • ⅓ cup almond meal/flour
  • ¼ teaspoon cinnamon

Blend all ingredients in a small bowl.  Form into small disks on a lightly buttered baking sheet.  Bake at 325 degrees for 13-15 minutes.


Kids, Lifestyle, Nutrition, Recipes

Five Make-ahead Healthy Breakfast Ideas

You’re a mom, so by definition you are busy.  And the busier you are, the harder it is make sure you and your family are eating nutritious meals.

A client and friend recently expressed this feeling with regard to breakfast items.  “Do you have any suggestions for fast healthy breakfasts in the morning?” she asked.  She noted that cereal is fast and always popular at her house, but she was looking for “real food’ alternatives that she could pull together in a few minutes in the mornings with minimal clean-up.

What a great question!  Who can deny the allure of placing a pile of Cheerios in front of your child to occupy her while you get ready for work?  And though we might love to make veggie and cheese omelets for the entire family every morning, who has time for that?

Fortunately, there ARE ways to improve your breakfast menu AND still make it to work or drop your kids to school on time.  They do require prep time, but you can do the preparation in advance.  Here are five ideas.

1. Overnight oats.   Instead of cooking your oats, blend them with yogurt, milk, mashed banana, frozen blueberries, cinnamon, salted and roasted almond butter, and some ground chia and/or flax for good measure.  Toss in the fridge before bed, and it’ll be ready to eat in the morning. My palate tells me it lasts a good three days before it starts to lose its integrity, so make a bunch.  I actually thought I invented this one until a friend told me about this “cool new recipe” that she read on some blog.  To my credit, I do make mine differently – and better, obviously 😉 – than the one she read about, but the basic premise is the same. You’re limited only by your imagination with the ingredients, so don’t feel wed to the ones I use.  I make these for myself, but they’d be good for anyone in the family.

2. Plain yogurt and fresh fruit.  Note the word “plain” here.  Yes, you can buy your yogurt with the fruit already inside, but you’re also going to get a lot of added sugar.  Nobody needs that.  Save time in the morning by mixing it all together the night before.  Buy your fruit pre-cut from the grocery store if that helps.  Frozen blueberries also work well.  If you want to take it on the go, invest in some travel containers.   If you’re looking to up your protein intake, eat plain Greek yogurt instead of regular.

Eggs and veggies on plate
…The cheesy broccoli and sliced grape tomatoes rounded out the meal. 🙂
Siyona eating eggs
The frittata can make for a nice lunch too! Here’s Siyona enjoying hers – and the sun (finally!) – on our deck last week…

3. Veggie frittata.  This is one that my toddler eats.  I saute frozen chopped spinach and kale then add that mixture to beaten eggs. I then pour it into an even layer in a frying pan, flip it once, and it’s done. A three-egg frittata lasts me three days.  I use a LOT of greens, referring to the egg as a mere means of binding it all together, but you needn’t be as heavy-handed. 🙂  I think it’s tastiest fresh, but my daughter eats it straight from the fridge with no problem. If you want to really stock up, you could pour the same egg mixture into cupcake tins and make crustless quiches that you freeze.  Then thaw in the fridge the night before you plan to eat one. Cheese would make a tasty addition to these too.

4. Make-ahead oatmeal.  Is it just me, or does instant oatmeal taste gross?  The science behind it mystifies me, since I think instant oatmeal is just pressed more thinly than rolled oats.  Maybe the Quaker people just use gross-tasting oats?  In any case, I know I prefer the taste and texture of the regular rolled oats, and I’ve heard at least some sources say they are nutritionally superior.  If you feel similarly, you can make a huge vat and then freeze individual portions in ziptop bags.  If you do this, definitely freeze them in a very thin layer to expedite future thawing.  You can freeze them plain or as you plan to eat them.  Cinnamon, blueberries, and a touch of salt make nice additions.

5. Hard boiled eggs.  These are so portable!  If you do plan to take these with you and are worried that you won’t have somewhere to put the cracked shells, you can peel them the night before.  People boil these a lot of different ways.  Here’s how I like to make mine:  place the eggs in a pot and cover with water.  Heat on high until water begins to boil.  Lower heat and let the eggs slow boil for one minute.  Remove the pan from the heat, cover the pot, and let them continue cooking for another 12 minutes.  Immediately cool in an ice-water bath (this prevents the yolk from turning gray on the outside) before storing in the fridge.

And if you absolutely MUST have your breakfast cereal (and I’m  not throwing stones here.  I fall into this category), you know there are healthier and more natural choices out there than Lucky Charms, right?  Some brands that get my general approval are Barbara’s, Nature’s Path, and Arrowhead Mills.  I can’t speak for all their varieties, but I know the ones I eat are made with whole grains, have very little added sugar, and have no preservatives.  Check your boxes carefully and abide my general rule of passing on any option with ingredients you can’t pronounce.

Kids, Nutrition

Five Tips for Eating Well When Eating Out: The Toddler Edition

Often you’ll hear people discuss how difficult it can be to eat well when dining out.  This is true not just for us big people, but it’s true for little people too.  So today I thought I’d share some strategies for helping your little ones eat well when a restaurant controls the menu.

I actually think it can be even HARDER for kids than adults to eat healthy meals at restaurant.  A big reason for this is the items you tend to find on children’s menus.  On a recent dinner out, here’s the menu the waitress handed me for my daughter:

  • Beef hot dog with fries
  • Cheeseburger with fries
  • Chicken tenders with fries
  • Cheese or pepperoni pizza
  • Kids pasta with cheese sauce, tomato sauce, or butter

Before I continue, I simply can’t resist the urge to get on my soapbox for a minute.  And it’s my blog, darnit, so I’m climbing up!  All too often I hear people say things like, “Kids don’t eat X,” where “X” is anything healthy and often something green.  And I can’t help but find this a self-fulfilling prophecy: to the extent that this is true, it’s true because we make it true.  When our children first start eating, they eat what we select for them. If they aren’t eating broccoli, it’s because we’re not feeding them broccoli.  If instead we feed them items like you see on the menu above because “that’s what kids like,” then guess what?  That’s what they WILL grow to like and expect.

And the longer we wait to introduce healthy foods to our kids, the harder it becomes to change preferences and behavior. Growing up my conception of vegetables was limited to green beans and corn that you get from a can.  And you know what?  I LOVED canned green beans and corn.  On the rare occasion that a fresh green bean wandered my way, I thought it tasted terrible!  I have a vivid memory from childhood of eating chicken noodle soup over at a friend’s house.  I was expecting Campbell’s and was hugely disappointed when my friend’s mom placed a steaming bowl of homemade soup in front of me.  It had carrots in it.  HUGE chunks of carrots.  I tried one – the first time I think I ate a carrot.  It was disgusting.

Over time my eating habits improved, but it took a LONG time.  At some point during college I started eating vegetables because I wanted to improve my diet.  At first I didn’t like them at all; then I started to tolerate them; and eventually I started to enjoy them.  Now I eat roasted Brussels sprouts like they’re candy.

[Chris steps down from the soap box]

So change IS possible, but we don’t have to make it so hard.  We can start our kids eating well when they are young.  And that takes us back to the issue at hand.  What do we do when menus like the one above greet us at restaurants, as they so often do?  Here are five suggestions.Children's menu

1. Pass on the children’s menu.  The host or hostess will almost surely offer a children’s menu when you arrive.  Glance it over quickly and say, “No thanks,” if it even remotely resembles the one above.

2. Share your entree with your little one.  Ok, so now you’re at the table without a children’s menu, but your little one still needs to eat.  Now what?  For young children who don’t strongly desire their own meals, order something for yourself that you can share with your child.  I often do this with my two year old, Siyona, and she’s perfectly happy to share.  If you’re committed to seeing your child eat well, this can be extra motivation for you to eat well too, which sometimes we need!  Plus, little kids often don’t have the appetite to eat their own meals, so you’re saving money AND avoiding waste.  I die a little inside when I’m dining out and see the server clear away the hardly-touched plate from the toddler sitting at the table next to me.

3. Make healthy side dishes and appetizers your friends.  For slightly older children who really want something of their own and/or for those with slightly larger appetites, order them something but not a full meal.  Now that Siyona is getting a little older, I might share part of my meal with her but also order her a healthy side dish, such as sauteed vegetables or brown rice.  Good choices for a healthy appetizer might be chicken satay, shrimp skewers, or tomato basil mozzarella salad.

4. Reinvent the menu. I will often ask my server to make simple modifications to the menu.  You know how restaurants often have protein “add-ons” to salads, such as grilled chicken or salmon?  Those make a wonderful main dish for a little one, and not once has a server declined this request.  If you see avocado anywhere on the menu, you could ask for a bit of this at a small additional charge.  Same goes for any fruit or vegetable you know is a hit with your child. You can create your own children’s menu by just making simple requests like these.

5. Have something in your back pocket.  Or more specifically, have something in your purse or diaper bag.  I will often bring something simple from home for Siyona to eat as a last resort.  This is useful in cases where the menu options are SUPER scarce, if she needs a little something to fill out her meal, or if she’s just being picky.  (In general, she’s a great eater, but hey, she’s still two. Give her a break).  If you join me for dinner and search my bag, there’s a good chance you’ll find a bag of nuts, some raw veggie slices, plain yogurt, or my (not so) famous oatmeal (I feel like I link to this recipe in every blog post.  But it’s good!  I’m tellin’ ya!). The really nice thing about the nuts is that they take her forever to eat, and they don’t make a mess.  In other words, they keep her entertained for a LONG time.  Who needs crayons?

Some restaurants ARE coming around and offering healthier options for kids, but it never ceases to amaze me how many places still list chicken tenders and fries as the featured kids’ item.  And that’s in the DC-area where you might expect more enlightened thinking.  But at least now you’ve got some tips to make sure your little one is eating well while we wait for the rest of the world to catch up!

Nutrition, Pregnancy, Recipes

I Heart Trader Joe’s – Ten of My “Go To” Items (bonus recipe included)

Today’s post is going out to my longest standing client, Tracy.  During a recent training session, she told me she sometimes asks herself, “What would Chris think of this item?” while shopping at the Trader Joe’s.  She suggested I compile a list of my “go to” Trader Joe items in a WellMom post, and I’m here today to do just that!

Tracy also noted her tendency to pick up too many “snacky” products at the store and not enough “real food.”  I agree that the lure of packaged convenience foods is quite tempting, and by no means do I eat “real food” 100% of the time.  But I do my best to keep processed foods to a minimum, and most of the items below fall into the “real” – or at least “minimally-processed” – category.

I’m a girl who likes a deal, so you’ll notice that a lot of the options below are inexpensive relative to comparable items at other grocery stores.

OLYMPUS DIGITAL CAMERA1. Salted and roasted creamy almond butter.  I never understood the hype about almond butter until I tried this kind.  I now realize that roasting AND salting is key. The kind I find most often is raw without salt, which tastes stale to me.  And compared to other brands of roasted and salted almond butter, the Trader Joe’s variety wins out in texture too, which is rich and creamy.  It’s also a great value at $7.99 per 16 oz jar.  I’ve seen the same size jar cost twice as much other places!   I blend this into my daughter’s oatmeal, and I like it mixed into plain yogurt along with a bit of mashed banana and cinnamon.  Oh and on a spoon.  I like it on a spoon.  🙂

2. Organic avocados – 4-pack.  These are an awesome deal, coming in at just over a dollar per avocado!  My toddler, Siyona, and I eat avocado basically every day.  I typically dice it and add it to salads or omelets.  Siyona likes it as a stand-alone side dish with her lunch (it was actually her first solid food). The only drawback is that I have a hard time finding ripe ones, so I often have to buy them a few days before I want to eat them.

wild blueberries3. Frozen berries.  Frozen berries are GREAT for mixing into yogurt, smoothies, and oatmeal.  They’re especially nice at this time of the year when you can’t – or shouldn’t? – get fresh ones. One of my favorites are the organic frozen wild blueberries.  They’re smaller than regular blueberries, which I love.  At $3.99 for a 12 ounce bag, it’s hard to find a cheaper organic blueberry anywhere!

4. Grill pack of organic chicken.  The grill pack of organic chicken contains two bone-in chicken breasts and four drumsticks.  I typically don’t grill with these.  Instead I’ll bake the chicken breasts, shred them, then add the meat to a variety of different entrees.  What do I do with the drumsticks, you ask?  Well, a drumstick happens to be the perfect size for Siyona, so I’ll freeze them individually and use as needed.  Comes in handy on nights when my husband and I are going out and I need something to leave home for her.  Bone-in is admittedly more work than the boneless, but I happen to think it tastes a lot better, and I save the bones to make homemade chicken stock. Oh and did I mention it’s only $2.99/lb?  And that’s organic chicken!

5. Organic frozen chopped spinach.  This is such a versatile product.  I put it in everything from smoothies, to eggs, to pastas and stir frys. I’ve even been known to put it in my chicken enchiladas.  It’s a great way to up to veggie content of your favorite dishes!

6. Organic Power to the Greens.  This is Trader Joe’s blend of kale, spinach, and Swiss chard – three dark leafy greens rich in vitamins and minerals.  It’s the base for a lot of my salads.  $2.49.

7. Barbara’s Multigrain Spoonfuls.  Ok, ok.  So this one comes in a box.  Michael Pollen might be ashamed.  Cereal is a notable exception to my general tendency to abide by his mantra, “eat food, not food products.”  I guess you can call it my Achilles heel – I love starting my day with a bowl of it splashed with unsweetened almond milk.  And as far as I’m concerned, there are worse vices, especially when Barbara’s Multigrain Spoonfuls is one of my cereals of choice.  It’s pretty natural as boxed cereals go (read: no icky preservatives) and has only 5 grams of sugar per serving. If you enjoy Quaker Life cereal you will like this one, and your body will thank you for the omission of BHT, Yellow 5, Yellow 6…). And a HUGE 24-ounce box costs me a mere $3.99!

OLYMPUS DIGITAL CAMERA8. Canned salmon.  Some of you serious seafood eaters might balk at this one, but you’ll almost always find a can of TJ salmon in my pantry.  No, it’s not nearly as tasty as a fresh filet, but I really enjoy it as a salad where I combine the salmon with plain yogurt, kalamata olives, and capers.  If I have lemon on hand, I sometimes add that too.  Trader Joe’s also sells a nice kalamata olive tapenade spread that I sometimes substitute for the capers and olives.  Canned salmon is an economical way to get in those healthy omega-3’s! $2.49.

9. Brown rice and quinoa fusilli.  You’ve got me again.  This one also comes in a box.  Well, a bag actually.  But I’m giving it a pass because it has just two ingredients (I’ll let you guess what they are. Hint: they’re in the name of the product). And while no one in my family has a gluten problem, I happen to think we can all stand to eat a little less wheat.  I have no scientific basis for saying this, but I can’t help but wonder if the rise we’ve seen in gluten allergies is a result of the rise in gluten in our diets.  Someone should fund this study. $2.99.

10. Bagged nuts.  I have four go-to types of nuts at the TJ: roasted and half salted peanuts, roasted and half salted cashews, raw almonds, and raw pine nuts.  Nuts are a great “real food” snack, and we eat the peanuts, cashews, and almonds for that purpose.  I find the half salt a nice compromise – no salt is so bland, but full salt is so salty!  I toast the raw almonds in my toaster oven and eat them warm.  You have to try this!  They’re done when they start to crackle.  They don’t need salt!  I like the pine nuts for my homemade pesto.  I’m including my recipe for that below, just for good measure.  🙂

Basic Pestopesto crop

  • 2 cups basil, packed
  • 1.5 T minced garlic (about 3 cloves)
  • ½ cup pine nuts
  • 1 t crushed red pepper flakes
  • 1 t salt
  • ⅔ cup extra virgin olive oil
  • ⅔ cup Pecorino Romano cheese,* grated

Combine basil through salt in a large food processor.  While blending the dry ingredients, drizzle in the olive oil until smooth.  Then stir in the cheese.

*Frugal tip: Traditionally pesto is made with Parmesan cheese, but Pecorino Romano is WAAAY cheaper.  The flavors aren’t identical, but with all the other strong flavors in the pesto, my palate can’t detect a difference.


Exercise, Pregnancy

Core Strength and Diastasis Recti

Diastasis what-ti?  If that’s what you’re thinking, you’re not alone.  Even I hadn’t heard of it before my training in pre- and postnatal exercise.  Let’s start with an anatomy lesson, move onto a definition, then discuss what to do about it.

When we talk about the core, we often think of the rectus abdominis – i.e. the “six pack” –  or the outermost abdominal muscles.  The deepest of all the abdominal muscles is the transversus abdominis, or the TVA.  While the muscles of the rectus abdominis run vertically, the muscles of the TVA run horizontally, acting like a corset to pull all four side of the body together.  The linea alba is the fascia (tissue) that connects the left and right halves of the rectus abdominis.

A primary role of the TVA is to provide spinal stability.  When the TVA is weak, our bodies compensate and provide stability in other ways.  This has a variety of negative consequences, including lower back pain, muscular imbalances, and poor posture.

Image taken from diastasisrehab.com

Diastasis Recti refers to the separation of the rectus abdominis into left and right halves. Although anyone can have a diastasis, it’s common in pregnant and postpartum women because the growing uterus leaves the TVA overstretched and undertoned.  The rise in the hormone, relaxin, during pregnancy also facilitates a diastasis because it softens and relaxes fascia all over the body, including the linea alba. The TVA is further traumatized in women who deliver via c-section, as the surgery cuts through the muscles.

Not sure if you have a diastasis?  Not to worry.  You can ask your OB or midwife to evaluate you at your next appointment, or you can do it yourself.  If you want to self-diagnose, here’s one video I recommend.  Oh, and if you have a “mummy tummy” (y’all know what I’m talking about, right ladies?), there’s a VERY good chance you have a diastasis.

Estimates of the prevalence of diastasis recti are high, ranging from two-thirds to 100 percent of women in their third trimester.*  While you may not be able to avoid the condition, research shows that diastasis is less prevalent and less severe among women who exercise regularly.  The best exercises are those that focus on strengthening – you guessed it – the TVA.

Recall that the muscle fibers of the TVA act like a corset, pulling the four sides of the body together.  To strengthen the TVA, you need to tighten and relax that corset, much like you tighten and relax your bicep muscles when doing bicep curls in order to strengthen them.

Below are pictures of me illustrating this contraction.  As it turns out, I’m not only the owner and founder of WellMom, I’m also a client.  🙂  I have a two year old daughter, and I’m expecting my second in July.  The pictures below were taken when I was 17 weeks and four days pregnant with number two.  I’m drawing in my abdominals (i.e. tightening the corset) in the picture on the left and relaxing my abdominal muscles in the picture on the right.

OLYMPUS DIGITAL CAMERA  OLYMPUS DIGITAL CAMERA

The pelvic tilt is an EXCELLENT exercise to strengthen the TVA. If you have an existing diastasis, it’s also a very useful for rehabilitation.  Here’s one way to perform the exercise:

Lie on your back with your knees bent and your feet flat on the floor.  Begin in a neutral spinal position (you should be able to slide your hand between the small of your back and the floor).  Take a deep breath in.  As you begin to exhale, tilt your pelvis back, shifting your tailbone up.  Press the small of your back firmly into the floor and imagine drawing your navel in towards your spine and drawing the two sides of your rib cage together. Take another deep breath in, releasing the tilt and returning to a neutral spinal position.

You can make this exercise more challenging with the addition of heel slides.  To do this, while your pelvis is tilted back, slowly slide one heel along the floor until the leg is fully extended, then slowly draw it back in.  Release the tilt, returning to a neutral spinal position, then repeat on the opposite side.  For an even greater challenge, slide both heels simultaneously.

If you’re pregnant and uncomfortable lying on your back, you can also perform this exercise standing.  Stand with your head, shoulders, and hips against the wall, but with your feet away from the wall and your knees bent.  Tilt the pelvis and draw your navel toward your spine, as for the supine version.

I prescribe pelvic tilts to my clients, and I’ve been doing them daily as a part of my TVA strengthening routine since learning of my current pregnancy.  In fact, this technique has helped me to close the small diastasis that I had at the start of this pregnancy.  So get your pelvic tilt on!


*Benjamin, D.R. et al.  2013.  Effects of Exercise on Diastasis of the Rectus Abdominis Muscle in the Antenatal and Postnatal Periods: A Systematic Review.  Physiotherapy 100(1): 1-8.

Exercise

Total Body Stair Run Circuit

So how’d you do this past weekend?  Is the heart-shaped box of chocolates from your Valentine now empty, or did you limit yourself to a few pieces? Did you pass on the chocolate mousse at dinner on Saturday night, or did you eat yours AND your sweetie’s?

If you’re a little embarrassed by some of your answers, don’t be!  It’s ok – even good – to splurge every once and a while (though not so good to make it a habit).

But if you DID do some damage this weekend, I’ve got a workout to get you back on track.  

And all you need is a set of stairs.

I love workouts that you can do anywhere.  In fact, I shared one just after Thanksgiving, so be sure to check it out if you missed it.  And like the post-Thanksgiving workout, the one I have for you today also uses metabolic training, which maximizes calorie burn and increase metabolic rate during and after the workout by increasing EPOC.

As you do the workout, rely on the principle of rest-based training: push yourself as hard as you can while you’re working until you simply have to take a break.  Rest for as long as you need (but not longer!) and repeat.

Total Body Stair Run Circuit

Note:  Because of the risk of tripping during the stair runs, this exercise is not recommended for prenatal moms. Postpartum moms who aren’t yet ready for intense training should also avoid this circuit.

Warm-up

Walk up and down the stairs five times.

20-minute Circuit

Repeat each exercise sequentially, completing as many rounds as you can in 20 minutes.  Push yourself as hard as can while you’re working, breaking as often as you need.

1. Run up and down a flight of stairs five times (i.e. do five stair runs)

2. Set of 15 push-ups (on knees or toes on the floor)

You can also do with hands on stairs (even easier) or feet on stairs (even harder), as pictured below

OLYMPUS DIGITAL CAMERA  OLYMPUS DIGITAL CAMERA

3. Four stair runs

4. Walk the stairs quickly once, taking two steps at a time

5. 60 second front plank (knees or toes)

OLYMPUS DIGITAL CAMERA  OLYMPUS DIGITAL CAMERA

6. Three stair runs

7. Walk the stairs quickly twice, taking two steps at a time

8. 10 static lunges with each leg leading, placing your lead foot on the first or second step

OLYMPUS DIGITAL CAMERA  OLYMPUS DIGITAL CAMERA

9. Five stair runs

10. Set of 15 tricep dips, using the bottom step

OLYMPUS DIGITAL CAMERA  OLYMPUS DIGITAL CAMERA

Cool-down

Walk in place (two minutes)

Then pause for a moment, congratulate yourself, and feel those Valentine’s Day calories melting away. 🙂

Lifestyle

Enter the Travel Blog: Puerto Rico

Hi!  Wasn’t I just saying something last week about how I abhor the cold?

Well, I found a temporary fix last Tuesday when I skipped town for a week in Puerto Rico!  I’m scheduled to return tomorrow night, but I’m seriously considering “accidentally” missing my flight.

Since I’m on vacay, I decided to provide a few highlights from the trip in lieu of the recipes and workout tips you’re accustomed to seeing.  I know this is a health and wellness blog, but R&R is a part of that, right?  And in any case, it’s my blog and I’ll write about what I want.  🙂

We rented a condo in San Juan for the week, and we’ve been splitting our time between San Juan and other areas of the main island.  We invited my parents to join us on the trip as a 45th anniversary gift (Happy Anniversary, Mom and Dad!).  They were kind enough to look after Siyona while Neil and I went biking through Pinones, an area just outside of San Juan.  We rented bikes from a COPI shop, which we thought were a steal at $5 an hour until we learned why they were so cheap – they’re all in terrible condition! The tire on the first bike Neil rented blew out when we cycled just a few hundred meters from the shop!  We cycled back and he swapped it out with the beauty pictured below.

OLYMPUS DIGITAL CAMERA

The pink water bottle came with the bike.  Lucky Neil.

Despite the poor condition of the bikes, it was a truly lovely ride.  Stretches of it were along the coast, but the trail also took you through the nicely shaded Bosque de Pinones, or Pinones Mangrove Forest.

OLYMPUS DIGITAL CAMERA  OLYMPUS DIGITAL CAMERA

On Saturday we spent several hours in Old San Juan.  Our first stop was a coffee shop recommended by the Lonely Planet called Finca Cialitos.

Let me digress for a moment with a side story.  I absolutely love coffee, but about 6 months ago I wanted to see if I’d feel better throughout the day if I gave it up.  I was hoping that I’d feel exactly the same on or off coffee because truly the last thing I wanted to do was stop drinking it!  But alas, after about a week of feeling like garbage (turns out I had a bit of an addiction on my one coffee a day!), I was feeling better when off the coffee: my sleep improved, and my energy levels were more balanced throughout the day.  After mourning the loss of my regular cup of joe, I’ve come to appreciate coffee as an occasional treat.

And what better treat than having my favorite espresso drink at Finca Cialitos!  Siyona liked it too. Well, she liked the cups anyway.  I told her no coffee until she’s at least 3.

OLYMPUS DIGITAL CAMERA  OLYMPUS DIGITAL CAMERA

After taking our time at the coffee shop (things move slowly in Puerto Rico), it was off to tour the rest of Old San Juan.  As luck would have it, a street circus was taking place that weekend, and we made a new (very tall) friend.

OLYMPUS DIGITAL CAMERA

And lest you think we skipped the beach, we’ve definitely spent our share of time there too.  Here are two pics of me and Siyona walking along the beach in Isla Verde, one of the nicer beaches in San Juan.

OLYMPUS DIGITAL CAMERA OLYMPUS DIGITAL CAMERA

Those are just a few of the highlights anyway.  If I ever start a REAL travel blog, I’ll cover things in greater detail.  And once again, excuse the hiatus – I’ll be back again soon with my usual workout and nutrition-related material.  If you still feel cheated, check out the archives – I’m sure there’s at least one post you’ve yet to read!  🙂

Nutrition, Pregnancy, Recipes

Hearty Chicken Sausage Soup

I am very much a warm weather person.  There is basically nothing I like about the winter.  I’m pretty sure my blood is about the consistency of water.  I am always cold!

One coping mechanism that gets me through the long, cold winters is soup.  I used to find them intimidating to make until I realized that there’s really no wrong way to make a soup.  It’s kind of like making a salad.  There really aren’t any rules.

Recently I whipped up this recipe for hearty chicken sausage soup.  I like it for many reasons.  First, I love the in-house sausage sold at the Whole Foods.  I tend to steer clear of most packaged sausages because of the junk that comes along with them (nitrates/nitrates, MSG, propyl gallate — say what?).  But the Whole Foods sausage I buy contains none of these mysterious items.IMG_0411

Second, the recipe contains only “good carbs,” by which I mean beans, legumes, whole grains, and starchy vegetables.  Both the barley and the chickpeas in this recipe are loaded with fiber – important for digestive health and also good for fat loss – and vitamins and minerals.  In fact, I find soups are a great way to experiment with all those good carbs you can find in the bulk bins at the grocery store.  Ever try cooking with wheatberries?  You should!  You could easily swap out the barley for them in this recipe.

Oh and here’s a cook’s tip:  barley and a lot of other whole grains can take a LONG time to cook.  Make a huge batch and then freeze leftovers in smaller portions for future use.  I find that it helps to freeze them in zip-top plastic bags in a thin layer, as the increased surface area makes for faster thawing.

The third thing I like about this recipe is the rainbow chard.  I think I read recently that “chard is the new kale.”  When you look at all it has to offer, the reputation is warranted.  One cup of cooked chard has four grams of dietary fiber (15% DV) and is also a good source of vitamins A, C, and K, among others.  Pregnant women – who need about 50% more iron in their diets than non-pregnant women – should know that a one cup cooked serving offers four milligrams of iron, or 15 percent of their DV (22 percent for non-pregnant women).

Now, I always make my own chicken stock, but I appreciate that I’m a bit of an odd duck when it comes to this sort of thing.  🙂  I really do think it tastes way better than what you buy in a can or carton, but I appreciate the time and effort that goes into making it.  This may spell F-U-N for me, but it won’t for everyone!  So feel free to use what makes most sense for you!

And if you have little ones and you’re worried they won’t eat it, here’s a picture that begs you to reconsider. 🙂

IMG_0407

Hearty Chicken Sausage Soup

  • 1 tablespoon olive oil
  • 4 links Whole Foods made in-house spicy Italian chicken sausage (about 1 – 1 ¼ lb)
  • 1 onion, diced
  • 3 celery stalks, diced
  • 3 carrots, diced
  • 1 bunch rainbow chard, roughly chopped
  • 6 cups chicken stock, preferably homemade
  • 3 cloves garlic, minced
  • 3 cups barley, cooked
  • 2 cans chickpeas, rinsed and drained
  • salt and pepper to taste

Heat 1 tablespoon olive oil in a stainless steel dutch oven over medium heat.  Slice the sausage into rings, then cut the rings in half.  Add the sausage to the pan and saute until cooked through, about 4-5 minutes.  Remove the sausage from the pain but leave any remnants behind.

Stir in the onion, celery, carrots, and a bit of salt to the pan, scraping the bottom of the pan to free up any sausage remnants. Saute until the vegetables are tender, about 5-10 minutes.  And the rainbow chard and saute until wilted, about 3 minutes.  Mix in the garlic and stir until fragrant, about 1 minute.  And the chicken stock, barley, and chickpeas.  Stir.  Bring to a low simmer.  Add salt and pepper to taste and serve.  Feel warm and happy.


Exercise, Pregnancy

The Importance of Unilateral Exercises (and Five Good Ones!)

Just about everyone has some type of muscular imbalance.  This might take the form of one set of muscles being relatively strong compared to another, such as having a strong chest relative to the back or strong quads relative to glutes and hamstrings.  A client might also have asymmetrical muscular imbalances, such as when the right glute is stronger than the left glute.

A given muscular imbalance tends to create a domino effect because our nerves, muscles and bones are all connected via the kinetic chain.   For instance, the lats attach to the pelvis and shoulders.  If the lats are short and tight, it anteriorly rotates the hips, rounding the lower back.  This loosens and inhibits/weakens the glutes.  The hip flexors, including the tensor fasciae latae, are then shorter and tighter, causing the knees to roll in and the arches of the feet to collapse.

So who cares and so what?  Well, muscular imbalances are often the root cause of common ailments.  Have lower back pain?  Suffer from joint pain, maybe in your knees?  There’s a good chance a muscular imbalance is at play.

Moms have a special reason to suffer from muscular imbalances: the way we carry our babies.  If you’re standing and holding your baby, you probably always place her on the same hip and sink into that hip.  This can cause pain in your lower back, hips, and knees, among other things.  If you’re walking around with your baby, you probably always carry him on that same side of the body.  This can tighten your chest muscles and weaken and loosen your upper back muscles on the carrying side.

WellMom takes a corrective approach to resistance training that addresses these muscular imbalances.  In addition to focusing on strengthening weak muscle groups and stretching tight ones, I employ unilateral exercises – those that work one side of the body at a time – whenever possible to correct those asymmetrical, left-right imbalances.

Below are five of my favorite unilateral exercises.  In some of them, notice that I’m holding a dumbbell in one hand only.  This forces your core to work harder (a good thing!) because you’re activating the muscles of your posterior oblique chain – the latissimus dorsi and oblique on the side of your body with the dumbbell, and the gluteus maximus on the opposing side.

Incorporate a few of these exercises into your next workout and let me know how it goes!

Five of My Favorite Unilateral Exercises

1. Single arm chest press on Swiss ball

OLYMPUS DIGITAL CAMERA OLYMPUS DIGITAL CAMERA

2. Single leg squat

OLYMPUS DIGITAL CAMERAOLYMPUS DIGITAL CAMERA

3. Single arm bentover row

OLYMPUS DIGITAL CAMERAOLYMPUS DIGITAL CAMERA

It’s a little hard to tell here, but I’m holding the dumbbell in one arm only.

4. Single leg deadlift

OLYMPUS DIGITAL CAMERAOLYMPUS DIGITAL CAMERA

If you don’t have a Swiss ball or find this exercise too challenging when using it, place your rear foot on a more stable surface, such as a chair or step.

5. Lunge with “baby” on one shoulder

OLYMPUS DIGITAL CAMERAOLYMPUS DIGITAL CAMERA

This is another one with just one dumbbell (errrr, baby!).  And, uh, speaking of babies, I’ve been keeping a secret.  But judging by these pictures, it’s kind of looking like that secret is out.  🙂

Lifestyle

Gratitude

Today’s post is a little bit different than what you’re used to seeing.  No recipes, no workout tips, no nutrition lessons.

Today’s post is about gratitude.  My gratitude.  For all of my clients. For my friends.  For my family.  For you.

In addition to running WellMom, I teach group exercise classes at a local gym.  Last week I received an anonymous holiday card from one of the gym members.  (Apparently, it took a while for the card to find me!).  Inside the card was a handwritten note: “May you and your family have a splendid holiday and much happiness in 2015.  Thank you for such wonderful, thoughtful, and enjoyable classes this year.”  It was signed by an anonymous “fan.”

This card totally made my day!  How lucky was I to have touched someone to the point where they would go out of their way to write me this card for no other reason than to just say thanks?

Several other clients also helped to make my recent holiday a little brighter with their own similar notes.  Here are some excerpts:

I have felt so much better from a mental and physical standpoint since starting to train with you…thank you for all you do for me…

Thank you for all your help returning me to my pre-pregnancy self!

Thank you for your wonderful training sessions with me.  I am very grateful and very pleased with my progress.

I think my favorite holiday card ever came last year.  The best part of that note was this:

Thank you for making my life better!!!

I started WellMom after giving birth to my daughter.  Fitness was just a side job for me until this point.  I taught a few indoor cycling classes each week at a local gym on weekends and on weekdays after coming home from my “real job.”  (I used to do survey research, if you can believe that!).  I liked my job well enough, but I also knew it wasn’t the best fit for me.  I did some soul searching during my maternity leave and decided now was a good opportunity for me to take the plunge and try to make a career out of my true passion: health and wellness.

And here we are now, two years later.  Helping clients to achieve their fitness and wellness goals gives me so much more pleasure and sense of purpose than working behind a desk ever did.

Has the road been completely smooth?  Of course not.  I’ve had countless moments of self-doubt along the way, feelings I still face from time to time.  But each time I touch someone – in the words of my client, each time I help to make their lives BETTER – I find a renewed sense confidence in my decision to change career paths.

So I am thankful for my clients and their thoughtful holiday cards.  I am thankful for their kind testimonials and reviews of my services.

I am grateful too for my friends and family who have supported me along the way.  WellMom wouldn’t be here without my husband, who encouraged me to take the leap and quit my old job and who helps me work through my moments of self-doubt.  And I have countless other family members and friends who have helped me work through ideas for the company, provided loving words of encouragement, and also challenged me where appropriate.

I’m also thankful for all the people that WellMom touches who I don’t personally know:  the people who read my blog, who like my Facebook page, who share links to my resources, who refer me to their friends.  Since you’re reading this now, that means I’m grateful to you too:  thank you.  🙂

If you’re interested in reading more about WellMom’s mission, be sure to check out my previous blog post, Putting the “Well” in WellMom.  It will give you a better sense of what it means to me to make the lives of my moms better.